
5.24.2009
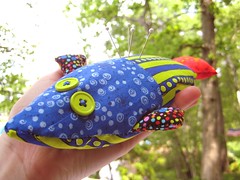
fishy pincushion
I'm helping my mom get her etsy shop open! Shes a crafty gal, shes one of the people who gave me and my sisters their talent (my dads the other one). So here's the very first listing ever! Its a balsam stuffed pincushion. FRESH! Its really adorable, and I cant believe the work that goes into making these little things. But really, she cant stop. She is rarely seen without sewing mat attached to her hands. Please visit the new shop! SewSoft.etsy.com
5.19.2009
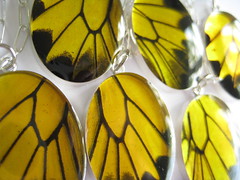
The Little Things,,, Hello Sunshine!
I really love taking photographs, and find myself with a camera in my hand all day long. I especially love macro, and hers a good example of why. I see these pendants all the time, I'm constantly making them and working with them. To me, they are all something that I fawn over a little bit, for the few moments that it is mine, and then wrap and ship out. When I take a photo of it like this, I can get all excited about it again, by seeing it in a different light.
5.17.2009
dancing bird
shadow dancing
Originally uploaded by PoPkO!
5.14.2009
New Butterfly Wing Ring in the shop!
I've been busy busy taking photos of all my new butterfly wing jewelry! Here's a glimpse of the newest ring I have in there. I tried using foliage to make it a little more nature-y looking. What do you think?


Have a lovely day!
5.12.2009
DIY Instructions - How to make a ring display for craft shows!
 I had a big show last week and needed a new ring display. I wanted something sturdy and with a little bit of chunk to it, so I could show off my Glitter PoP Rings.
To make your own, you can get some ideas from this tutorial. Scouting out the right box and fabric are key. You can make any kind of ring tray you want with this in mind. Mine cost me about $16 total. You can certainly buy one already made for that price, but making you own enables you to customize it to your own ring size and make it match the rest of your display more than the commercial ones.
This is my first blog tutorial, so bear with me!
First, I had to decide how many rings I wanted it to hold. I estimated about 40 or 50 each, as I have about 100 + rings.
Supplies:
-trays (mine were $7.00 with a coupon)
-foam , just larger than your tray (mine were $7.99, but look at the thrift shop, or take apart your own chair!)
-opaque fabric, twice the size of your foam (the first one I used was too sheer and showed the green foam through it, and I had to find some more opaque fabric)
Tools:
-scissors
-box cutter
-marker
-ruler, or any stick to stuff fabric down (hand works too)
I found some bamboo house ware trays at Bed Bath & Beyond. They are stacking, and these would have been great if I could have had a little less foam, then I could have set up the rings at home and just stack them and bring it to the show. But I wanted the rings to sit right at the brim for easy viewing. Plan this when purchasing your foam. How thick do YOU need your foam to be?


Above:
I bought two trays. The green foam is from Joanns fabric, and is for seat cushions. They had all sorts of thicknesses and densities. I got one that had a big of heft to it, so that the rings would stay in the tray. If it is too floppy, your rings wont have anything to grab them, so go for dense.


Above:
Lay your tray over the foam, and score a line where you will cut it. I used the outside of the box to measure, knowing that I need a tight fit. If the foam is larger than the box, when I put it in the box it will expand and stay put. I did this all by eye and just winged it.


Above:


Above:


Above: I had to cram the fabric into the sides with a ruler and my fingers and lots of tug-o-war. So dont be afraid to really get in there. I had to do it twice on each ring box, take the fabric out and put it back in to get it to look nice. Make sure you get the fabric ALL THE WAY DOWN to the bottom so that it doesn't come out when people are trying on rings.
Here's my final product! This is what it looked like at the craft show (boy what a messy table). I think I will go back and get a few more trays. They had smaller ones and I think I want a small tray for each of my fused glass rings with different prices. I also had a lot of foam left over to do this again. This was an easy project that didn't require any glue. I love that!


Above:
Cutting was satisfying..it made a nice clean line. Snip snip! But the foam was a bit thick so I found myself cutting twice over every line. I had to be careful not to shred it, but it was easy.


Above:
Stuff the foam in to check the size. if its tooooo big, just snip again. Mine had to be stuffed into it, which is what I wanted. I don't want it to move AT ALL.


Above:
I then set my intended rings onto the top to see how far apart they needed to sit. I have large rings, that needed a lot of space. I marked with a sharpee where I would need to cut.
Take the foam out of the box again and cut on the lines!
Note: I thought I would just need to kind of slice halfway down the foam, but decided to cut the foam completely at each black line. So I marked the foam #1-#12 so I could put the puzzle back together after cutting them. Once I sliced completely through, I stacked and stuffed the foam back into the box. There was a lot of finagling and wiggling to get it to stuff back in and look neat and tidy. Just work it in.
Next, lay the fabric on top. I found the center of the fabric by folding it in half, and stuck the middle into the middle foam crease. This helped me evenly distribute the cloth.

Above: I had to cram the fabric into the sides with a ruler and my fingers and lots of tug-o-war. So dont be afraid to really get in there. I had to do it twice on each ring box, take the fabric out and put it back in to get it to look nice. Make sure you get the fabric ALL THE WAY DOWN to the bottom so that it doesn't come out when people are trying on rings.
You can see that this was my first try, and you can still see the green through the fabric. I switched it out the next day with a velour sort of fabric. This felt nice to touch and made the rings look a lot more refined as well.
Here's my final product! This is what it looked like at the craft show (boy what a messy table). I think I will go back and get a few more trays. They had smaller ones and I think I want a small tray for each of my fused glass rings with different prices. I also had a lot of foam left over to do this again. This was an easy project that didn't require any glue. I love that!


edit: here's a new photo. I also use the larger box to hold cuff bracelets and matching rings.
edit: some people have been asking where to find the rings (thanks!) - I make them myself and sell them in my online Etsy shop. www.popko.etsy.com
edit: some people have been asking where to find the rings (thanks!) - I make them myself and sell them in my online Etsy shop. www.popko.etsy.com
5.09.2009
Springtime!
Heres a few photos of my post spring showers and beautiful outdoorsy things Ive been enjoying.


5.07.2009

Twist Fair!
The two-day show this weekend was a success! Heres some photos:
My studio table, days before the show. I like to make make make! I made about 100 glitter pop rings. That was exhausting. Next time I will try to just keep up with it so I dont have to make soooo many at once. They really sparkled at the show though, the lights were awesome.

Needless to say, I didnt sleep much last week. Im always last-minute.
Here's the view while I stood on a chair at my booth.
 Shoppers shopping!!!
 This is my new display stand below. It was great for the fused glass, but I had to change the one for the butterfly jewelry, as it didnt show off well enough. Part of my craft show experience is getting the displays down pat. I feel like I have had a differetn set-up at every single show. I need to set it up in my house more often so that Im not fiddling with it at the shows anymore.
Oh, and I made that ring holder! Its a bamboo box from bed bath & beyond, made to hold desk things or kitchen organizing. Its pretty on the outside, and I stuffed it with foam and fabric to become a ring display. I made two of these. They REALLY worked, because I sold more fused glass rings than ever before.
 Above, you can see my first enormous fused glass pendants. I love them. The ones that didnt sell there will be in my Etsy shop soon. Also, you can see the suncatchers that I made. They make me very happy happy (but the needed a better display).
Above, my table, day two. I thought there was a 2 foot max requirement for all displays, (at least thats what the rules said), so I abided, even though my display is always higher. Everyone else in the room had mile-high displays. Like- everyone. Wah. So now I know that I can eliminate that rule if I get in again for November. Everyone knows that a higher display is easier to look at.
To see more photos take a peek at the flickr group here: Twist Photos
Or check out the incredibly organized and informative website for the show here : TwistFair
So thats my brief update for now. Back to the etsy orders!
Subscribe to:
Posts (Atom)